Table of Contents
ToggleBlue ocean bathroom tiles bring the calming, restorative feel of coastal waters into a home without the maintenance headaches of actual beachfront property. In 2026, these tiles continue to dominate bathroom renovations, not just for their aesthetic appeal, but for their versatility across modern, transitional, and even traditional designs. Whether someone’s working with a cramped powder room or a sprawling primary bath, the right blue tile can visually expand the space, anchor a color palette, and hold up to decades of moisture exposure. This guide walks through styles, shades, design strategies, and installation fundamentals so homeowners can tackle the project with confidence.
Key Takeaways
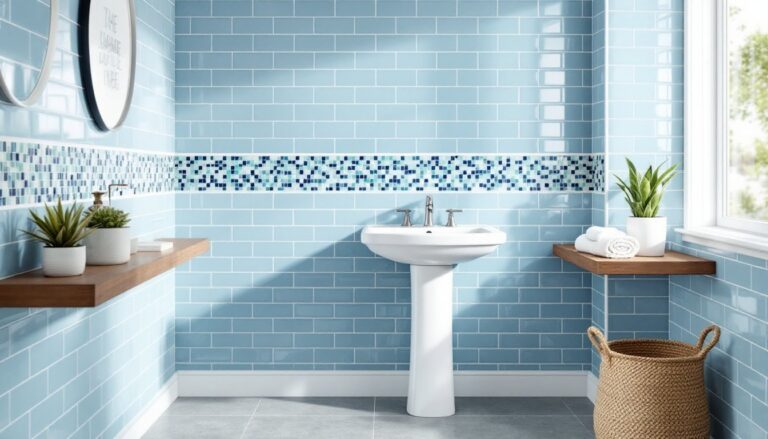
- Blue ocean bathroom tiles create a calming, water-resistant aesthetic that works across modern, transitional, and traditional designs while improving resale value.
- Choose lighter aqua and sky blues to visually expand small bathrooms, or deep navy and teal tones to add drama to larger spaces—always sample tiles under your actual lighting before committing.
- Glass mosaics, ceramic, and porcelain offer different benefits; glass provides visual depth for accent areas while porcelain tiles are more durable for shower floors and wet zones.
- Proper waterproofing with liquid or sheet membranes, cement board backing, and high-quality grout with penetrating sealer are non-negotiable to prevent mold and structural damage.
- Layer blue ocean tile designs with complementary materials like natural wood, brass fixtures, and white marble to prevent the space from feeling too clinical and to enhance overall sophistication.
Why Blue Ocean Tiles Are Perfect for Modern Bathrooms
Blue sits at the cool end of the spectrum, which makes it a natural fit for spaces that deal with heat and humidity. Psychologically, it registers as clean and calming, two qualities most people want when they step into a shower at 6 a.m. or soak in a tub after work.
From a design standpoint, blue pairs well with white fixtures, brushed nickel hardware, natural wood vanities, and even warmer accent colors like coral or sand. It doesn’t fight for attention the way a bold red or yellow might, so homeowners have more freedom to layer textures, linen shower curtains, woven baskets, matte black faucets, without the room feeling chaotic.
Practically, ceramic and porcelain tiles in ocean blues are highly water-resistant, durable, and easy to clean. Glazed finishes resist mold and mildew better than porous stone, and most blue glazes hide soap scum and hard water stains more effectively than stark white. For resale value, blue bathrooms photograph well and appeal to a broad demographic, which real estate agents appreciate.
Finally, blue ocean tiles work in small and large bathrooms alike. Lighter aquas and sky blues reflect light and make tight spaces feel larger, while deeper navy or teal tones add drama to spacious layouts without overwhelming them.
Popular Blue Ocean Tile Styles and Patterns
Glass and Mosaic Blue Tiles
Glass mosaics remain a top choice for accent walls, shower niches, and backsplashes. These tiles typically come in 1-inch or 2-inch squares mounted on 12 × 12-inch mesh sheets for easier installation. The translucent quality of glass catches light and creates depth, especially effective in showers with recessed lighting or windows.
Glass tiles are non-porous, so they won’t harbor bacteria or mold, but they do show water spots more readily than matte finishes. Plan on regular squeegee duty if someone goes this route. They also require a white or light-gray thinset to prevent the adhesive from showing through and dulling the color.
Mosaic patterns range from simple running bond to intricate herringbone, hexagon, or even custom gradients that fade from pale aqua to deep cobalt. Glass mosaics cost more per square foot than ceramic, typically $12 to $25 per sheet, but the visual payoff often justifies the investment for feature areas.
Ceramic and Porcelain Ocean Blues
Ceramic and porcelain tiles are the workhorses of bathroom installations. Porcelain is denser and slightly more water-resistant, making it the better pick for shower floors and wet areas, though both perform well when properly installed.
Common formats include 3 × 6-inch subway tiles, 4 × 12-inch planks, 12 × 24-inch large-format slabs, and hexagonal or arabesque shapes. Subway tiles in aqua or turquoise are classic and budget-friendly, usually running $2 to $5 per square foot. Large-format tiles reduce grout lines, which means less maintenance and a cleaner, more modern look, but they require a flatter substrate and a bit more skill to install without lippage (uneven edges).
Finishes matter. Glossy glazes amplify light and color saturation, while matte or satin finishes offer a softer, more contemporary feel and hide imperfections better. Textured surfaces add slip resistance for shower floors but can be harder to clean.
For design flexibility, many homeowners mix formats, subway tiles on walls with hexagon mosaics on the floor, or a large-format porcelain slab as a shower accent with smaller phenomenal bathroom tile combinations on surrounding walls.
Design Ideas for Blue Ocean Bathroom Tiles
Accent wall or full wrap? A single tiled accent wall, behind a freestanding tub or vanity, delivers impact without the cost or visual weight of tiling every surface. Full-wrap showers in lighter blues create a serene, spa-like enclosure, while keeping the rest of the bathroom neutral prevents the space from feeling too themed.
Floor-to-ceiling vs. wainscot height: Running tile all the way to the ceiling makes a small bathroom feel taller and simplifies waterproofing in wet zones. Stopping at wainscot height (around 36 to 48 inches) pairs well with shiplap, beadboard, or paint above, adding textural contrast and reducing material costs.
Pattern play: Vertical stacking elongates walls, horizontal running bond widens narrow spaces, and diagonal or herringbone layouts add energy. Hexagons and arabesque shapes inject a handcrafted, artisan feel that’s trending in 2026.
Grout color strategy: White or light-gray grout keeps the look airy and highlights the tile shape, but it requires more upkeep. Mid-tone gray or even charcoal grout hides stains and creates a modern grid effect. Always use epoxy grout or a high-quality sanded/unsanded grout with a penetrating sealer in wet areas to prevent mold and discoloration.
Mixing materials: Pairing blue tiles with natural wood (a teak bench, floating shelves, or a live-edge mirror frame) warms the palette and prevents the space from feeling too clinical. Brushed brass or matte black fixtures provide contrast, while marble or quartz countertops add a layer of sophistication. Interior design platforms like Homedit often feature these layered looks in contemporary bath galleries.
How to Choose the Right Shade of Blue for Your Bathroom
Light blues (aqua, sky, powder): These shades reflect light and make small bathrooms feel more spacious. They pair effortlessly with white trim, chrome fixtures, and coastal decor. Ideal for bathrooms with limited natural light, as they won’t darken the room.
Mid-tone blues (turquoise, teal, seafoam): These offer more personality without overwhelming the space. They work well in medium-sized bathrooms and can anchor a color scheme that includes warm woods, brass accents, or patterned textiles. Teal, in particular, bridges cool and warm tones, making it versatile.
Deep blues (navy, cobalt, indigo): Bold and dramatic, these shades suit larger bathrooms or powder rooms where someone wants to make a statement. They pair beautifully with white marble, gold hardware, and high-contrast black accents. Be cautious in small, windowless bathrooms, they can feel cave-like without adequate lighting.
Sample before committing: Always order sample tiles and view them in the actual bathroom under both natural and artificial light. Blue shifts dramatically depending on the light source. What looks crisp and bright in a showroom may read green or gray at home. Tape samples to the wall and live with them for a few days, checking them in morning light, evening light, and under the vanity bulbs.
Consider existing fixtures: If the toilet, tub, and sink aren’t being replaced, the tile shade needs to harmonize with them. Bright white fixtures pair with any blue, but almond or biscuit fixtures (common in older homes) may clash with cooler blues and work better with warmer teals or turquoise.
Undertones matter: Some blues lean green (aqua, turquoise), others lean purple (periwinkle, indigo), and some are true blue with no shift. If the rest of the home has warm beige or taupe tones, a greenish blue will tie things together. If the palette skews gray and white, a true or slightly purple-leaning blue maintains consistency.
Installation Tips for DIY Bathroom Tile Projects
Assess the substrate: Tile needs a solid, flat, and moisture-resistant backing. In showers, that means cement board (like Durock or HardieBacker) or a foam backer board such as Wedi or Kerdi-Board. Drywall alone isn’t sufficient in wet areas, it’ll sag and rot. Check local building codes: most jurisdictions follow the International Residential Code (IRC), which requires waterproof membranes behind tile in tub and shower enclosures.
Waterproofing is non-negotiable: Apply a liquid waterproofing membrane (RedGard, AquaDefense) or install a sheet membrane system (Schluter Kerdi, Wedi) over seams, corners, and the entire shower pan. Miss this step, and water will eventually reach the framing, leading to mold and structural damage. This isn’t optional.
Plan the layout: Dry-lay tiles on the floor or use a story pole to determine where cuts will fall. Avoid ending with slivers less than an inch wide, they’re hard to cut and look unfinished. Adjust the starting point so cuts are symmetrical or tucked into less visible corners. For subway tiles, decide on a running bond, stacked, or offset pattern and mark level lines with a laser level or chalk line.
Thinset selection: Use a modified thinset for cement board installations and an unmodified thinset with certain membrane systems like Schluter (check manufacturer specs). For glass tiles, use white thinset to prevent color shadowing. Mix to a peanut-butter consistency, too wet and tiles will slide, too dry and they won’t adhere properly.
Notched trowel size: Use a 1/4 × 1/4-inch square-notch trowel for tiles up to 8 inches, and a 1/2 × 1/2-inch trowel for anything larger. Comb the thinset in straight lines, and back-butter large-format tiles to ensure full coverage and prevent voids that can crack under stress.
Spacers and lippage: Use tile spacers (typically 1/8-inch for walls, 1/4-inch for floors) to maintain consistent grout lines. For large-format tiles, consider a lippage leveling system (like Raimondi or T-Lock) to keep edges flush, critical for preventing trip hazards and an uneven appearance. Remodeling resources such as Remodelista often showcase professional installations that illustrate these best practices.
Cutting tiles: A wet saw with a diamond blade is the gold standard for clean, accurate cuts. For small notches or curved cuts (around pipes or fixtures), use a tile nipper or an angle grinder with a diamond blade. Always wear safety goggles and a dust mask, tile dust contains silica, which is hazardous when inhaled.
Grouting: Wait at least 24 hours after tiling before grouting (longer in humid conditions). Use unsanded grout for joints less than 1/8-inch (like mosaics) and sanded grout for wider joints. Work grout into joints with a rubber float held at a 45-degree angle, then wipe diagonally with a damp sponge to avoid pulling grout out of the lines. Buff off haze with a microfiber cloth once it dries.
Sealing: Seal grout lines with a penetrating sealer after the grout has fully cured (usually 48 to 72 hours). Reapply annually in wet areas to maintain stain and mold resistance. Natural stone tiles also require sealing, but glazed ceramic and porcelain do not.
Know when to call a pro: If the project involves moving plumbing, replacing a shower pan, or any work that requires a permit, hiring a licensed plumber or tile contractor is the smarter move. Tile work is forgiving in some ways, but waterproofing and structural integrity aren’t areas to gamble on.