Table of Contents
ToggleA closet pantry isn’t the most glamorous space in a home, but it’s often the most valuable. Converting an underused closet or optimizing an existing pantry can solve persistent kitchen overflow, eliminate countertop clutter, and actually make meal prep faster. The difference between a functional closet pantry and a chaotic one comes down to intentional design, shelving depth, adjustable hardware, lighting placement, and the right combination of open and closed storage. This guide walks through proven design strategies that maximize every square inch, from floor-level bulk storage to door-mounted spice racks, with practical advice on what works and what doesn’t.
Key Takeaways
- A well-designed closet pantry design maximizes storage in compact spaces by using adjustable shelving with varying depths (6–16 inches), proper spacing (10–18 inches vertically by zone), and door-mounted organization to hold 200+ items in under 25 square feet.
- Optimize closet pantry visibility and functionality with layered lighting—motion-sensor LED bulbs (5000K–6500K spectrum) in existing fixtures or battery-powered puck lights under shelves prevent expired products and reduce food waste.
- Door storage adds 12–18 square feet of capacity using over-the-door racks for lightweight items (under 15–20 pounds on hollow-core doors) and rail systems rated for 30+ pounds of heavier goods like canned items.
- Strategic containerization using clear, airtight bins for dry goods and tiered risers for cans improves access; label bins specifically with contents and quantities rather than generic categories for consistent inventory management.
- Most closet pantry projects are DIY-friendly for homeowners confident with basic tools, costing $150–$400 and taking a weekend; hire professionals only for electrical work, structural changes, or custom built-ins beyond standard shelving installation.
What Is a Closet Pantry and Why Choose One?
A closet pantry is a dedicated storage space, typically a converted coat closet, linen closet, or purpose-built reach-in closet, used exclusively for food, small appliances, and kitchen overflow. Unlike walk-in pantries, closet pantries are compact (usually 24 to 36 inches deep) and rely on vertical organization and door storage to compensate for limited square footage.
Homeowners choose closet pantries when kitchen cabinet space falls short or when they want to separate dry goods from everyday dishware. They’re particularly common in galley kitchens, apartments, and homes built before 1980, when large pantries weren’t standard. A well-designed closet pantry can hold 200+ items in a 24-square-foot footprint, more than most base cabinet runs.
The key advantage is visibility. Everything sits at eye level or within arm’s reach, unlike deep corner cabinets where items disappear. The trade-off is width: closet pantries demand ruthless organization and can’t accommodate bulk buys of paper towels or large coolers the way walk-ins can.
Smart Shelving Solutions for Maximum Storage
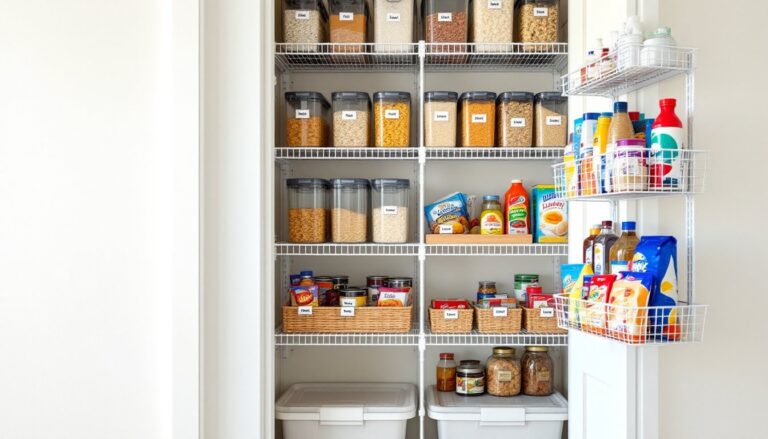
Shelving makes or breaks a closet pantry. Standard wire shelving sags under weight and lets small items tip over: solid wood or melamine shelves are sturdier but cost more. The sweet spot for most DIYers is adjustable wire or coated-steel shelving with clips or tracks, which allow for reconfiguration as needs change.
Shelf depth matters. In a 24-inch-deep closet, 12-inch-deep shelves leave enough clearance to see items in back without pulling everything forward. Go deeper (16 inches) on lower shelves for bulk goods like flour sacks or canned cases. Shallower shelves (6 to 8 inches) near eye level work well for spices, oils, and small jars.
Shelf spacing should vary by zone. Leave 14 to 16 inches of vertical clearance for cereal boxes and pasta containers, 10 to 12 inches for canned goods, and 18+ inches on one shelf for stand mixers or small appliances. Fixed, evenly spaced shelves waste usable height.
Many DIY shelving setups repurpose modular systems like IKEA’s Algot or Elfa, which use wall-mounted tracks and movable brackets. These systems handle 50+ pounds per shelf and install with a drill, level, and stud finder. If wall studs don’t align with shelf placement, use toggle bolts rated for drywall, standard plastic anchors won’t support a loaded pantry shelf.
For narrow closets (under 30 inches wide), consider pull-out shelving or sliding baskets mounted on full-extension drawer slides. This adds cost (around $40–$80 per slide pair) but prevents the “archaeology dig” effect when reaching for items in back.
Door Organization: Make Every Inch Count
The back of a closet pantry door is 12 to 18 square feet of unused real estate. Over-the-door racks, adhesive hooks, and mounted baskets can recover significant capacity without touching the walls.
Over-the-door wire racks with adjustable baskets are the most common add-on. Choose racks that hang from the top of the door rather than models that require screws, unless the door is solid wood. Hollow-core doors (standard in most homes built after 1990) can’t support more than 15 to 20 pounds without cracking, so prioritize lightweight items: foil, plastic wrap, sandwich bags, snack pouches, and spice jars.
For heavier storage, mount a door-mounted rail system directly into the door frame or solid door panel using wood screws. These systems (like those from Rev-A-Shelf or Rubbermaid) use S-hooks or clip-on baskets and can hold 30+ pounds when properly anchored. They’re ideal for canned goods, condiment bottles, or baking supplies.
Keep door storage shallow, no more than 4 inches deep. Anything bulkier interferes with door swing and scrapes against items on interior shelves. Also check door clearance: if the pantry door opens into a tight hallway or against a wall, door-mounted storage may not be practical.
One often-overlooked option is adhesive metal strips for magnetic spice tins. They install in minutes, hold securely on metal or wood doors, and keep small jars visible and accessible. Just wipe the door surface with isopropyl alcohol before applying adhesive to ensure a strong bond.
Lighting and Visibility Upgrades
Most closet pantries rely on a single overhead bulb or worse, borrowed light from an adjacent room. Poor lighting leads to expired cans, duplicate purchases, and wasted food.
The simplest upgrade is a motion-sensor LED bulb in the existing fixture. These screw into standard sockets, activate when the door opens, and draw minimal power. Look for daylight-spectrum LEDs (5000K to 6500K), which render food colors accurately and reduce eye strain. A 60-watt-equivalent LED provides enough light for a typical 24-inch-deep closet.
For pantries without overhead wiring, battery-powered LED puck lights or strip lights work well. Mount puck lights under each shelf to eliminate shadows, or run adhesive LED strips along the front edge of shelves for continuous illumination. Battery-powered options require AAA or rechargeable batteries and last 30 to 100 hours depending on use. Hardwired strip lights (which tie into existing circuits) are more permanent but require cutting drywall and fishing wire, consider hiring a licensed electrician if you’re not comfortable working with 120V wiring. Check local codes: some jurisdictions require closet lighting to meet specific safety standards under the National Electrical Code (NEC), especially about bulb enclosures and clearance from combustibles.
Visibility also depends on shelf material. Wire shelving reflects more light than solid wood, and white or light-colored shelves brighten dark corners. If you’re painting wood shelves, use a semi-gloss or satin paint for easy cleaning and light reflection.
Container and Labeling Systems That Work
Containers turn a closet pantry from a pile of boxes into an organized system. But not all containers are equal, and over-containerizing wastes space.
Airtight bins (like OXO or Rubbermaid Brilliance) are ideal for flour, sugar, rice, pasta, and cereals. Square or rectangular bins use space more efficiently than round ones. Choose clear containers so contents are visible at a glance, and measure shelf depth before buying, a 10-inch-tall container won’t fit on a shelf with 9 inches of clearance.
For canned goods and jars, tiered shelf risers or can dispensers keep labels visible and prevent cans from rolling. Simple acrylic or wire risers cost $10 to $20 and double usable shelf height. Rotating can dispensers (which load from the top and dispense from the front) are pricier ($30–$50) but enforce first-in, first-out rotation, helpful for households that stock up during sales.
Baskets and bins group like items (baking supplies, snacks, breakfast items) and pull out like drawers. Wire baskets allow airflow for root vegetables like onions and potatoes: solid plastic bins work for packets, pouches, and small jars. Label the front of each bin with a label maker or chalkboard labels, handwritten labels fade and smudge.
For a streamlined approach inspired by pantry organization best practices, decant only high-use staples (flour, sugar, coffee, oats) and leave less-used items in original packaging. This saves time and reduces unnecessary container purchases.
Labels should be specific: “baking supplies” is vague: “chocolate chips, sprinkles, food coloring” tells you what’s inside without opening the bin. Use a consistent labeling system throughout the pantry, mixing handwritten, printed, and chalkboard labels looks chaotic.
DIY vs. Professional Installation: What to Consider
Most closet pantry projects fall within the skill range of a confident DIYer with basic tools: a drill, level, stud finder, and measuring tape. Installing adjustable shelving, door racks, and LED lighting typically takes a weekend and costs $150 to $400 in materials, depending on shelf quantity and hardware quality.
DIY makes sense when:
- The closet has standard dimensions (24 to 36 inches deep, 6 to 8 feet tall)
- Wall studs are accessible and spaced at standard 16-inch intervals
- No structural modifications are needed (removing walls, relocating doors, adding outlets)
- You’re comfortable using a drill and level, and can lift and mount shelving units
Call a professional if:
- The project involves electrical work beyond swapping a bulb (adding outlets, hardwiring lights). Licensed electricians ensure code compliance and safe installations.
- You’re removing a wall or door to expand the closet. Load-bearing walls require structural permits and engineer approval in most jurisdictions.
- Custom cabinetry or built-ins are part of the plan. A carpenter or closet company can design around odd dimensions, integrate pull-outs, and build in features like spice racks or appliance garages.
- You’re installing heavy-duty pull-out shelving or motorized systems that require precision mounting and weight distribution.
Custom closet companies (California Closets, Closets by Design, local cabinet shops) charge $800 to $2,500+ for a full closet pantry build-out, including design, materials, and installation. That’s 3–6 times the cost of DIY, but you get professional measurements, warranty coverage, and finishes that match existing cabinetry.
For ideas that balance cost and customization, many homeowners mix approaches: DIY the shelving and lighting, then hire a carpenter for one or two custom pull-outs or a built-in spice rack. This keeps labor costs down while adding high-impact features that are tricky to build from scratch.
Conclusion
A well-designed closet pantry doesn’t require a big budget or advanced carpentry skills, just intentional choices about shelving depth, lighting, and how items are stored. Start with adjustable shelves to accommodate changing needs, add lighting so nothing hides in shadows, and use containers only where they genuinely improve access or freshness. Whether tackling the project solo or bringing in a pro for custom elements, the goal is the same: a pantry that works with how the household actually cooks and shops, not against it.